
Unicorn Cake: 1 Ultimate Guide for Magical Baking
Table of Contents
Unicorn cakes have captivated dessert lovers worldwide, bringing a touch of whimsical magic to celebrations. Their vibrant colors, enchanting decorations, and overall fantastical aesthetic make them a showstopper at any party. This ultimate guide will walk you through the steps to create your own stunning unicorn cake, complete with all the essential techniques and tips needed for a truly magical baking experience. Whether you’re a seasoned baker or a beginner, you’ll find everything you need to craft a cake that’s as delightful to look at as it is to eat.
What Makes a Unicorn Cake Special?
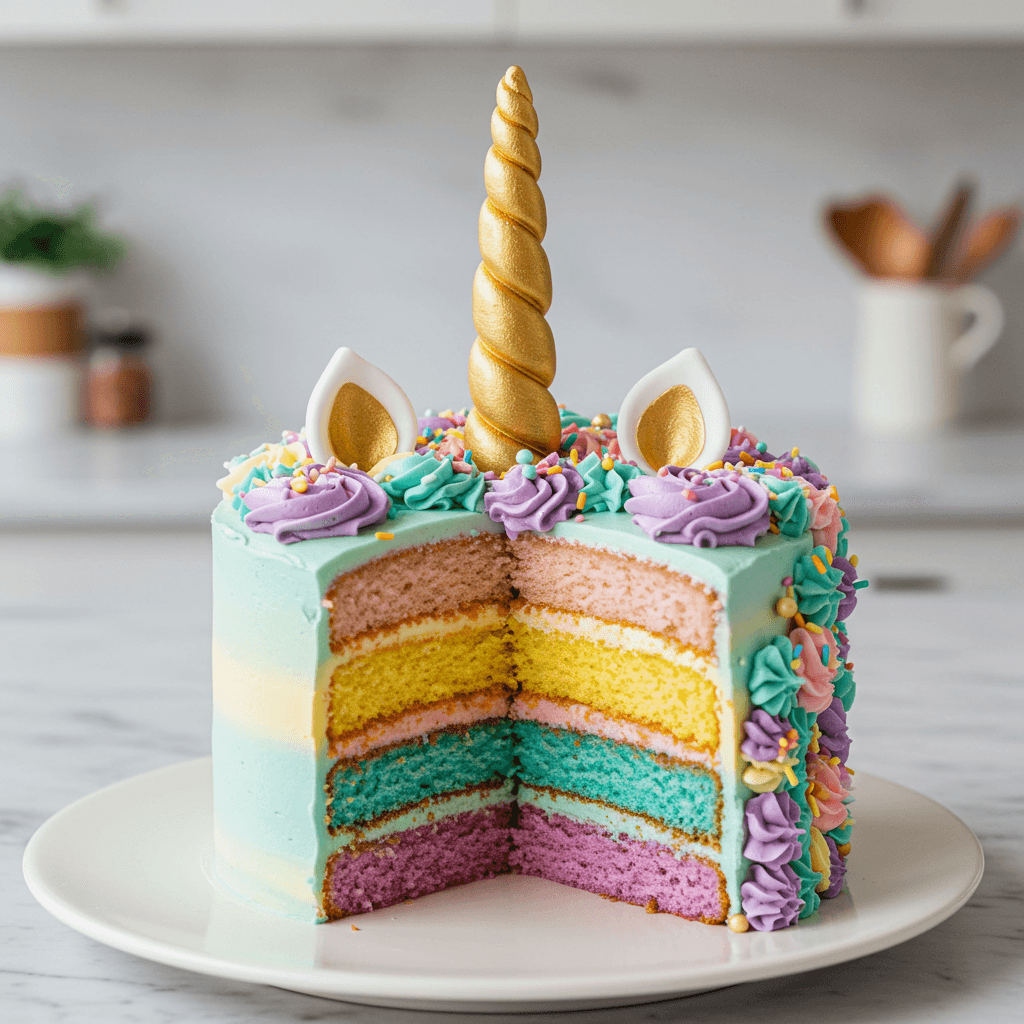
The true magic of a unicorn cake lies in its visual appeal. Imagine a cake adorned with a majestic golden horn, delicate ears, and a flowing mane of vibrant pastel colors. These elements transform an ordinary cake into a fantastical centerpiece. The very nature of unicorns, often associated with innocence and wonder, instills a sense of childlike joy in both bakers and cake enthusiasts alike. Unicorn cakes are ideal for birthdays, baby showers, or any occasion where a touch of enchantment is desired. The appeal goes beyond mere aesthetics, it’s about creating a memorable, joyous experience.
Essential Ingredients for Your Magical Unicorn Cake
Before you embark on your baking journey, let’s gather the necessary ingredients for the best unicorn cake.
Cake Base Options
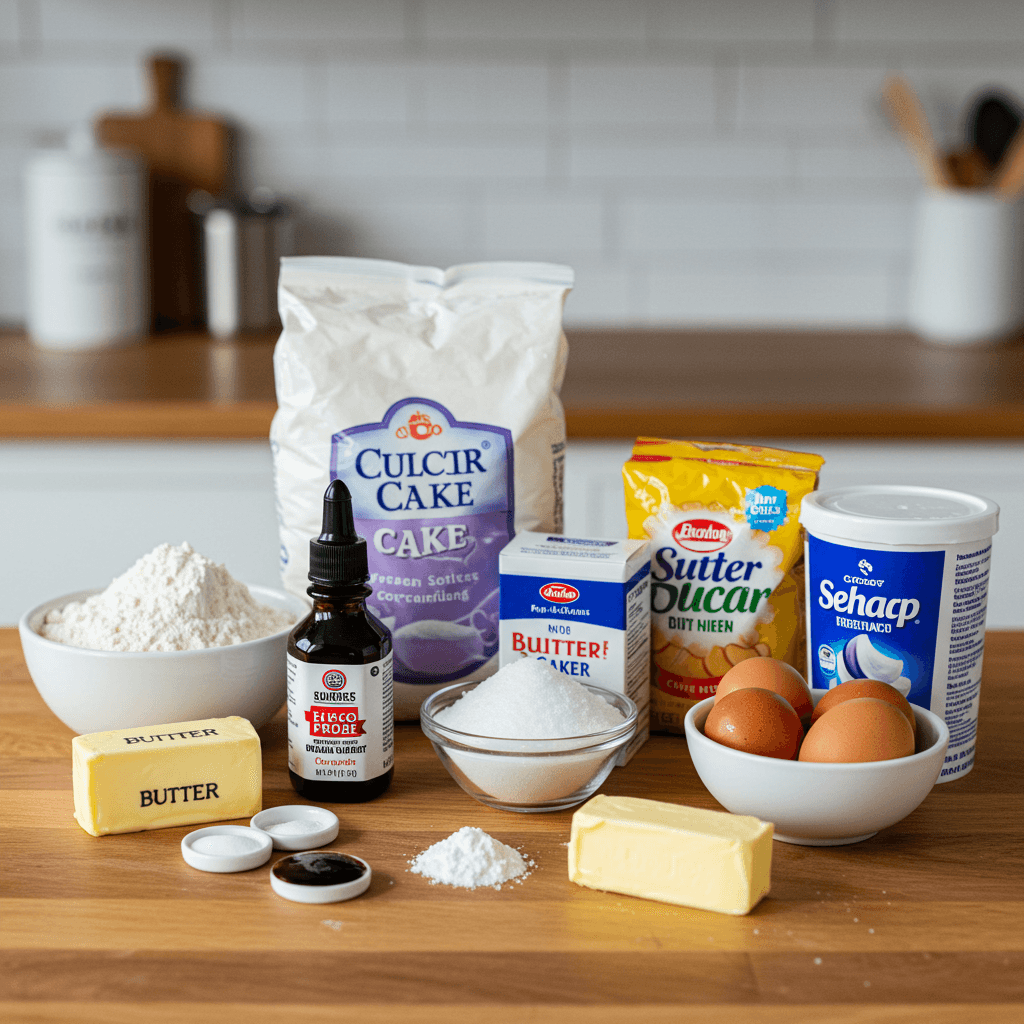
For a classic unicorn cake, a vanilla cake provides a perfect base. Here’s what you’ll need:
- 2 ½ cups (300g) all-purpose flour: Provides the structure for the cake. Ensure it’s fresh for the best rise.
- 1 ½ cups (300g) granulated sugar: Sweetens the cake. You can use caster sugar for a finer texture.
- 3 ½ teaspoons baking powder: Helps the cake rise and become fluffy. Check the expiry date to ensure its effectiveness.
- ½ teaspoon salt: Enhances the flavors of other ingredients and helps with gluten development.
- 1 cup (240ml) whole milk: Adds moisture to the cake. You can substitute with plant-based milk.
- ½ cup (120ml) unsalted butter, softened: Adds richness and flavor. Make sure it’s at room temperature for smooth blending.
- 2 large eggs, room temperature: Provides structure and richness. Room-temperature eggs mix better.
- 2 teaspoons pure vanilla extract: Enhances the flavor. Use a good-quality extract for the best results.
For a chocolate alternative, replace some flour with unsweetened cocoa powder. Lemon zest can be added to create a refreshing flavor. If dietary restrictions are a concern, consider gluten-free flour blends as a substitute.
Frosting and Filling Essentials
Buttercream is the go-to frosting for a unicorn cake due to its smooth texture and versatility. The components include:
- 3 cups (360g) unsalted butter, softened: The base of your frosting, ensure it’s at room temperature.
- 6 cups (720g) powdered sugar: Sweetens and thickens the frosting. Sift it for a lump-free frosting.
- ½ cup (120ml) heavy cream or milk: Helps achieve the right consistency. Add more if needed.
- 2 teaspoons pure vanilla extract: Flavor the frosting. You can try almond or other extracts.
- Gel food coloring: For the pastel hues for unicorn mane effect. Gel colors give vibrant hues.
For filling, you can use fruit jam, lemon curd, or chocolate ganache. The choice is yours, according to the personal taste.
Unicorn Decoration Supplies
Creating the magical elements requires some specialized supplies:
- Edible gold fondant: This is used to shape the horn.
- Edible gold luster dust or paint: To make the horn shine.
- White fondant or gum paste: For making the ears.
- Edible gel food coloring (pink, purple, blue, yellow, etc.): For the mane.
- Various piping tips: For decorating the mane and details.
- Edible glitter and sprinkles: For extra sparkle and shine.
Step-by-Step Guide to Baking a Perfect Unicorn Cake
Now that we have all ingredients ready, let’s delve into how to create a perfect unicorn cake from start to finish.
Baking the Cake Layers
- Preheat the oven: Preheat your oven to 350°F (175°C). Grease and flour your cake pans or use parchment paper at the base for easy removal.
- Cream butter and sugar: In a large bowl, cream the softened butter and sugar together until light and fluffy. This step is essential for a tender crumb.
- Add eggs and vanilla: Beat in the eggs one at a time, followed by the vanilla extract. Ensure each egg is fully incorporated.
- Combine dry ingredients: In a separate bowl, whisk together the flour, baking powder, and salt.
- Alternate wet and dry ingredients: Gradually add the dry ingredients to the wet mixture, alternating with the milk, beginning and ending with the dry ingredients. Mix until just combined. Avoid overmixing to prevent a tough cake.
- Pour batter into pans: Divide the batter evenly into your prepared cake pans.
- Bake: Bake for 25-30 minutes, or until a toothpick inserted into the center comes out clean.
- Cool: Let the cakes cool in the pans for a few minutes before transferring them to a wire rack to cool completely. Cooling is critical before frosting.
Making the Frosting
- Beat butter: In a large bowl, beat the softened butter until smooth and creamy.
- Add powdered sugar: Gradually add the powdered sugar, one cup at a time, beating on low speed until combined.
- Add liquid and vanilla: Add the heavy cream or milk and vanilla extract. Beat on medium speed until the frosting is light and fluffy. If needed add one tablespoon more of heavy cream or milk to adjust the consistency.
- Color the frosting: Divide the frosting into separate bowls and add gel food coloring to each bowl to achieve your desired pastel hues. Mix well and cover to avoid crusting.
Assembling and Filling the Cake
- Level the cake layers: Once the cakes are completely cool, use a serrated knife to level the tops of the cake layers for even stacking.
- First layer: Place one cake layer on a cake board or plate.
- Add filling: Spread a layer of your chosen filling evenly over the cake layer.
- Add second layer: Place another cake layer on top. Gently press to ensure it’s secured. Add filling again. Add the third layer if you used three layers.
- Crumb coat: Apply a thin layer of frosting over the entire cake. This seals in any crumbs and provides a smooth base for the final coat of frosting. Refrigerate for 20-30 minutes to allow the crumb coat to set.
Decorating Your Unicorn Cake
- Create the horn and ears: Roll edible gold fondant into a cone shape for the horn. Use the edible gold luster dust to make it shine. Shape the white fondant or gum paste into ear shapes, then let them harden slightly.
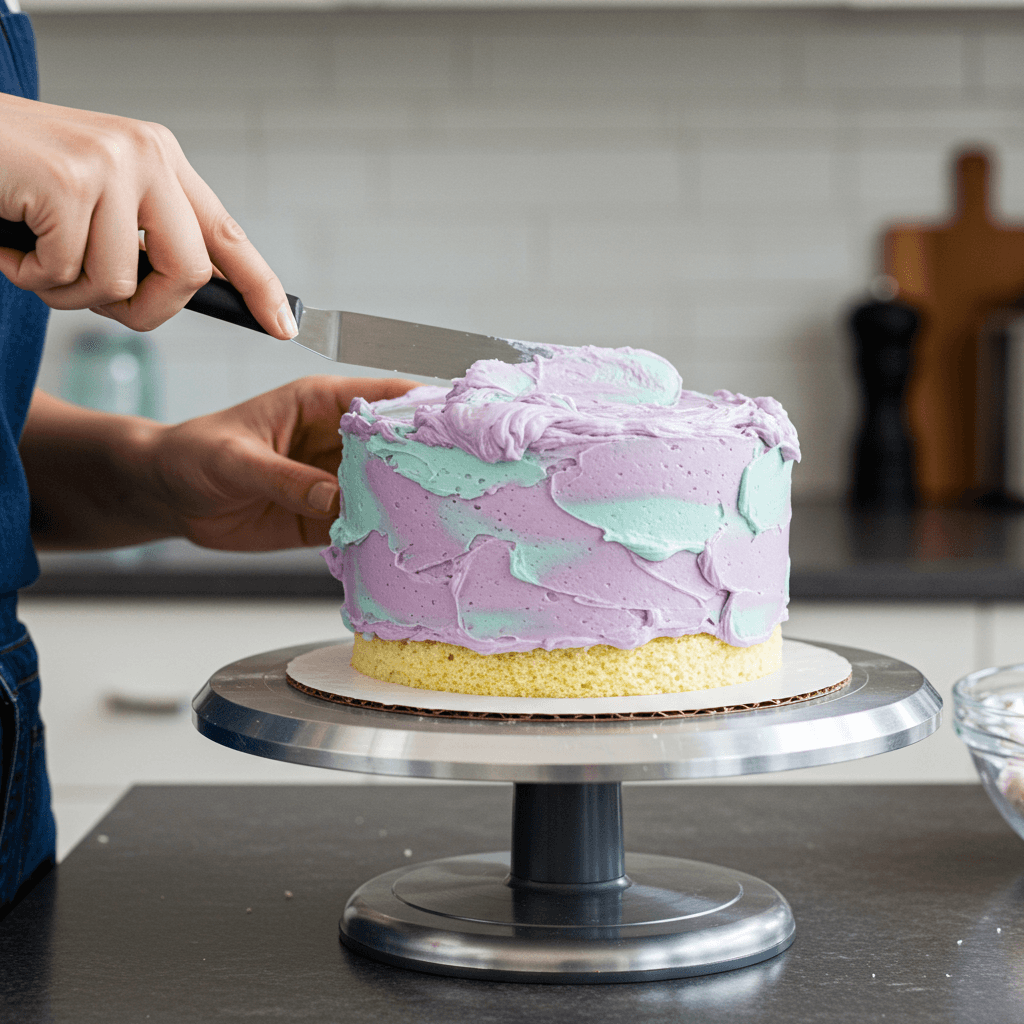
- Frost the cake: Apply the final layer of frosting over the crumb coat. You can do a smooth finish or textured finish according to your preference.
- Add the horn and ears: Gently insert the horn in the center top of the cake and attach the ears on each side of the cake.
- Create the mane: Use the colored frosting to pipe rosettes, swirls, or any mane details along the top of the cake and down the sides. Use different piping tips to achieve unique textures and patterns.
- Add final touches: Finish the cake by adding edible glitter and sprinkles for extra shimmer. Consider adding some small gold accents to match the unicorn horn.
Tips for a Picture-Perfect Unicorn Cake
To achieve that flawless unicorn cake, here are some extra tips that will elevate your masterpiece.
Frosting and Piping Techniques
- Crumb coat is key: A thin crumb coat is crucial for sealing in crumbs and creating a clean base for the final frosting. Don’t skip this step.
- Smooth frosting: Use a bench scraper or an offset spatula to achieve a smooth frosting layer. Work in light, gentle strokes.
- Consistent piping: Practice piping techniques on parchment paper before applying to the cake. Keep even pressure on the piping bag for consistent results.
- Piping tips: Try different piping tips for the mane for added interest. Consider using a star tip, rosette tip, or a multi-opening tip.
Color and Design Ideas
- Pastel paradise: Pastel colors give a magical vibe. Combine colors like pink, purple, blue, and yellow.
- Ombre effect: Create an ombre effect by gradually blending different shades of frosting colors.
- Mane Variations: Create a braided effect for a realistic mane. Use a spoon to create texture and dimension.
- Edible paints: Edible paints add extra depth and shine, perfect for highlighting the horn and other details.
Avoiding Common Baking Mistakes
- Don’t overmix: Overmixing leads to a tough cake. Mix until just combined.
- Cool completely: Ensure cakes are cooled before frosting to prevent melting.
- Level cake layers: Leveling the layers ensures stability and even frosting distribution.
- Room temperature butter: Room temperature butter blends more smoothly with sugar, creating a light and fluffy texture.
Unicorn Cake Variations and Creative Ideas
Let’s unleash the creativity with some stunning variations.
Rainbow Unicorn Cake
For a rainbow unicorn cake, divide the cake batter into several bowls and color each with different gel food coloring. Then layer them inside of the cake as you bake. For frosting, pipe colored buttercream in rainbow layers along the top and sides. This vibrant twist elevates the already fantastical unicorn cake.
Mini Unicorn Cakes
Transform cupcakes or mini cakes into individual unicorn delights. These are great for parties or as individual treats. Use mini fondant horns and decorate the mane with frosting swirls. You can also add edible glitter to create an extra layer of magic.
Unicorn Cake Pops
Cake pops are a fantastic, bite-sized way to enjoy unicorn flavors. Dip cake pops into melted candy melts, then add a tiny fondant horn and edible eyes. Create a mane using candy sprinkles or colored frosting.
Themed Unicorn Cakes
Take your creativity a step further by incorporating different themes. For a galaxy theme, use dark frosting with edible star sprinkles. For a mermaid theme, decorate with edible pearls, shells, and a shimmering tail fin. The possibilities are endless.
Frequently Asked Questions (FAQs) About Unicorn Cakes
What flavour is unicorn cake?
Typically, a unicorn cake is vanilla flavor, but the flavoring can be customized. Many bakers opt for a light, sweet taste to complement the pastel colors, however, you can select any flavor you prefer for your cake, for example, chocolate, strawberry, or lemon flavored cakes.
What flavor is the unicorn cake pop at Starbucks?
The Starbucks unicorn cake pop features a creamy vanilla cake center with a white chocolate coating. It has a signature pink and purple design, with an edible horn and sprinkle accents.
Where did the unicorn cake come from?
The unicorn cake trend gained popularity in the mid-2010s, largely due to its appeal on social media. The trend combined the whimsicality of unicorns with cake decorating artistry.
How to make a unicorn theme cake?
To make a unicorn theme cake, bake your preferred cake layers, frost it with buttercream, and decorate it with a fondant horn, ears, and a vibrant buttercream mane. Finish with edible glitter and sprinkles.
Conclusion: Your Journey to Magical Unicorn Cake Success
Creating a magical unicorn cake is a delightful journey. By mastering the techniques and using a sprinkle of creativity, you can create a cake that will bring joy to any celebration. Remember, practice makes perfect, so don’t be afraid to experiment with different colors and decorating techniques. Now it’s time to unleash your inner baker and bring your unicorn cake dreams to life. Share your finished creations and tell us about your journey to make your very own magical unicorn cake! Happy baking!